
Have you ever encountered problems while using an embroidery machine? Are you unsure how to adjust the different stitches for your projects?
Read on to learn about the different types of stitches and their different uses. You will have a clearer understanding of what each type of stitch is best for and be able to create beautiful, intricate designs with confidence.

Embroidery is a fun and rewarding craft–but it’s also a complex one. Understanding the different aspects of an embroidery machine is absolutely essential for anyone who wants to produce high-quality results.
This guide seeks to provide the framework necessary to understand what goes into an embroidery project, from thread types and needles, through hoop sizes and tension setting, all the way down to stitch types and their purposes.
By familiarizing yourself with these key concepts, you will become well-equipped to tackle any embroidery project that may arise!
Explanation of embroidery machines and their capabilities
Embroidery machines are computer-controlled sewing machines that can create complex designs, with the help of interchangeable types of stitches. An embroidery machine works with a needle and thread very much like a conventional sewing machine, but the addition of many “heads,” or softwares consisting of different stitch functions, puts it in a class by itself. Each head produces an individual type of stitch and functions in conjunction with the other heads to create intricate designs.
Thanks to advancements in technology, modern embroidery machines can produce an array of stitches on a variety of materials as well as creations that are limited only by one’s imagination. Depending on the type of embroidery machine and its capabilities some will offer any one or more of the following four main types of stitches: satin, chain, chenille and applique.
The Satin stitch – used for lettering and outlining designs – is created from multiple parallel lines that are connected at various points to create curves along a path like inside circles or equal shapes without leaving any gaps.
The Chain stitch is considered “traditional” because it has been used for centuries by hand embroiderers to outline figures as well as to fill in larger spaces. It is usually seen for outlining but can also be applied as fill work such as daises or flowers that results in an overall patterned appearance when completed.
The Chenille stitch is often thought to resemble velvet due its raised nature after completion and gives an ornate feeling to decor items such as bed quilts or pot holders when finished. It’s made up of several horizontal or vertical crosswise stitches placed close together across all directional lines creating straight diagonal patterns both inside and outside curved borders forming shapes like stars, diamonds or arcs amongst others.
Lastly is the Applique stitch which normally consists several rows wrapped tightly around each other with points being easily visible throughout the formation at each corner making perfect attributes for items needing names badges etc., plus lends itself perfectly towards logos containing letters either curved or angled who present themselves beautifully whether using foiled threads such as metallic golds & silver’s plus others including old gracefully looking naturals such as linen & cottons amongst countless alternatives where these individual yarns have been proven time after time remaining virtually fool proof every time when undertaking most exciting Sew outs available today!
Importance of understanding machine stitches and their uses
The embroidery industry is one that benefits greatly from the use of specialized machines. These powerful devices can produce high-quality garments in a fraction of the time it would take without one. It is important for embroiderers to understand the various types of stitches available on an embroidery machine, as well as their proper applications, in order for them to make the most out of their machine’s capabilities.
Understanding machine stitches and their uses is essential when selecting a design to be stitched out onto a garment. Different machines can offer different types and styles of stitches, making it crucial for operators to select the correct stitch for the item being embellished. For instance, certain stitches are more suitable for accentuating fine details and manipulating curves while other stitch types are better suited for covering large area fills or outlining designs. Knowing which type of stitch to use will help achieve a desired effect while keeping quality consistent throughout production.
Machine stitches also need to be properly adjusted with tension settings and thread weights in order to achieve an optimal result. Choosing an appropriate tension setting can help create firm, consistent stitching. Different fabrics require distinct tensions on any given project, so knowledge on this subject can have a dramatic impact on an operator’s ability to obtain perfect results time and time again. Thread weights should also be taken into consideration so that each stitch holds up under wear and tear; a thread too heavy may damage certain fabrics, yet using threads that are too light may compromise coverage needed for quality results.
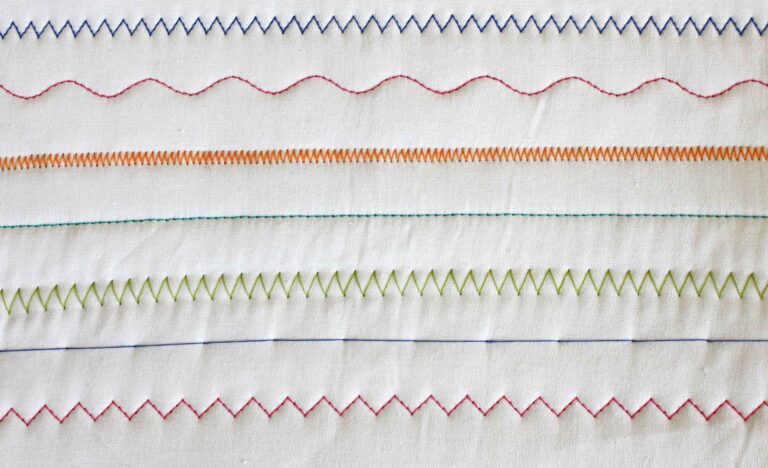
Types of Embroidery Machine Stitches
Embroidery machines are manufactured with a variety of stitching options that can be used to create stunning designs, embroidered letters and accent features in fabric. Knowing the different types of stitches is the key to choosing the right one for your project. Here are some of the most common stitches used on embroidery machines, along with how they can be used.
Running Stitch – This stitch is perfect for outlining patterns and creating texture on a surface. It is also commonly used for appliqué and basting fabrics together prior to sewing.
Satin Stitch – Ideal for intricate details such as lettering, this stitch has a smooth glossy finish that creates highlights in a design when stitched from one area of fabric to another. Choose from multiple widths and angles of satin stitching when creating projects with an embroidery machine. Some machines even offer decorative satin stitches like waves, stars or scallops!
Fill Stitch – This stitch can turn an ordinary line drawing into a colorful design by filling it in with small stitches arranged in various patterns such as dots, checkerboard or simple loops. Some machines even create fill stitches that are shaped like flowers or leaves!
Couching Stitch – A couch stitch secures layers of fabric together while giving designs dimension and texture by covering them with narrow ribbons or yarns that are held in place by tiny straight stitches. This type of stitching also works well for adding details to clothing items like collars and cuffs without increasing bulk on heavy fabrics like denim or canvas.
Piping Stitch – Perfect for creating decorative edges, this stitch resembles bias (or twisted) tape being sewn onto cloth using narrow straight stitching lines at each edge. This type of stitching comes in handy when decorating pillows, bags or pieces of apparel by adding touches such as buttons, ruffles
Running stitch
The running stitch is one of the most versatile and commonly used stitches when it comes to embroidery-making. Basically, a running stitch is formed by going through the fabric multiple times in one direction, making a line of little stitches along the way. This stitch creates an even line that can either outline or fill a specific area as desired. It is often used to join two pieces of fabric together, with the length of each stitch being variable depending on the use.
Running stitches are often used for outlining simple designs or filling in certain areas such as lettering within an embroidery project. They are also great for sewing patches onto clothing, making appliqués and quilting. Depending on how tight it is made, it can stretch quite nicely which makes it great for attaching pieces of fabric together in different ways without puckering or gathering the material. As this type of stitch is relatively quick and easy to do on an embroidery machine, it is ideal for larger projects where a lot of coverage needs to be done quickly such as quilts or wall hangings.
Satin stitch
Stitch length is important with satin stitch — too short, and the design will look “spotted” or “dotted”; too long, and it will look wavy or rippled.
Satin stitch is designed to create the look of satin on fabric. It is most often used for lettering and fill stitches. Letters stitched in a satin stitch are tightly packed together so that there are no gaps in between them, which makes them very easily read from a distance. The overlapping of threads creates a smooth solid surface that looks like satin when viewed from afar.

Fill stitches allow you to create any shape you wish with a design or a pattern for the surface of your fabric. They can be used to add color to the fabric without changing its texture or shape too drastically. This is why they are often preferred when looking for a subtle way to embellish fabric designs.
III. Uses of Different Machine Stitches
When utilizing the capabilities of an embroidery machine, it is important to select the right type of stitch for the job. Depending on your application and the material you’re working with, you should consider a variety of stitches. Here are some basic stitches along with their most common uses:
Satin stitch – often used for lettering or outlining small, solid-colored designs; also used in block fill and running stitch
Straight stitch – mostly used to hold fabric snugly together during construction; also commonly used in monograms and outlining
Fill stitch – a great choice for larger areas where a pattern is required, this creates an object with lengthwise or crosswise lines moving in one direction or alternating directions
Cross-stitch – popular for smaller details like fur, grass, hair, flames, etc. as well as larger patterns that combine different colors
Chain stitch – frequently used around curves (especially lines and circles) because it creates contours that are essential when pointing out shapes; also ideal for mending seams
Couching – generally combines different threads to achieve the desired look; perfect for adding ornamental line work around edges or bringing accents to specific elements of embroidery pieces
Applique – useful when stitching individual fabric pieces onto designs
Running stitch for outlining and simple designs
The running stitch is one of the most versatile and commonly used stitches on an embroidery machine. It’s a basic in-and-out threading pattern used to create simple outlines, edging, and patterns.
This stitch can be done with varying tension settings and lengths to create more intricate designs. For example, a light tension setting on a running stitch will allow the embroidery to lay flat while creating smoother curves and designs. The length setting of the stitch also affects how closely related points are connected by adding or removing tension or eliminating gaps between them for finer detailing.
It is also sometimes referred to as a straight stitch, line stitching, follow-the-pattern stitching, outlining stitching or seam stitching due to it’s frequent used when outlining patterns or working along seams.
Satin stitch for filling large areas and creating smooth edges
Satin stitch is well-suited for embroidery machine projects where it can be used to fill large areas and create smooth edges. It is a great choice for any project that needs intricate details or shading to create texture and dimension. In addition to creating a decorative finished look, satin stitch also provides strength when stitching large areas and lightweight fabrics.
When setting up your embroidery machine, you will need to adjust the needle type, thread tension and fabric support settings based on the material type you are using. Additionally, you will need to decide what satin stitch length you want in order to achieve the desired effect. The length of satin stitch affects the fullness of the design area being filled or edged; longer stitches will create fuller designs while shorter stitches may be better suited for thin lines or intricate designs.

The direction of satin stitching will also play a role in how your project turns out and must be taken into consideration along with needle type, thread tension and fabric support when deciding which settings are right for your specific project. Experimenting with different settings can help you determine which combination of factors yields the best results for your individual work piece.
Factors to Consider When Choosing Machine Stitches
When selecting a machine stitch, there are several factors to consider, such as the type of fabric, the desired effect, the availability of compatible threads and accessories, and even the budget. It is important to consider each factor carefully so that the final result meets your expectations.
Thread type: Different thread types can be used depending on the desired effect. Polyester thread is known for its strong hold, colorfastness, and sheen. It is often preferred for machine embroidery because it can be used with different fabrics and provides more durable designs than other threads. Cotton thread usually has a higher stitch count than polyester and may be better for light-weight fabrics due to its softness and flexibility. Rayon thread offers vibrant colors with a sheen finish that reflects light; it is great for replicating handwork techniques on machine-embroidered items. Metallic threads draw attention to a design while adding elegance as they reflect light in interesting ways; however they tend to be pricier than other thread types.
Embroidery Mastery: As you become more comfortable working with different machines stitches, you will gain confidence in your skill level associated with mastering embroidery techniques. You may find yourself trying more complex or professional stitches that call for specific tools or skills in order to achieve an array of looks at varying levels of difficulty.
Compatibility: Keeping in mind the project’s end goal will help when considering what embroidering elements should be considered at each step for optimal compatibility with other sewing projects or when fixing existing stitching errors. Seeking advice from experienced sewers if doubts arise can save from future frustration if something does not align correctly or if something does not work as expected due to lack of technical skill set with certain machines stitches especially those requiring larger needle sizesor heavy duty weight manipulation with cording materials (such as velvet).
Design complexity and size
When choosing a design to embroider, there are many factors to consider and one important element is the amount of stitch types used in the design and its complexity. For example, applique designs may use a greater variety of stitch types with greater stitch counts than simpler designs. The density of stitches can also vary by machine model, with smaller machines being limited by the size of their hoops to achieve higher densities than larger machines that offer larger hoop sizes.
Consideration should also be given to the size of the embroidery area and number of threads used when selecting a design. When using fine-weight threads such as rayon, fewer threads are required, whereas heavier weight threads like wool require more thread for proper coverage. Additionally, large areas can be filled in more easily with fewer stitches making for a cleaner result versus small intricate details which are better accomplished with higher stitch counts.
Ultimately, selecting an appropriate design will result in a product that shows off your skills and maximizes your machine’s capabilities.
Type of fabric and its texture
When selecting a fabric for your embroidery project, it’s important to consider both the type and the texture of the material. Different types of fabrics have different densities or weights, and thinner materials require small, tight stitches while thicker materials are better suited to larger stitches. You should also consider the nap, or length and density of the fabric’s fibers; a fabric with a long-napped surface creates more friction between the needle’s eye and the thread; this friction causes more heat to build up and can cause tension problems if not monitored closely. Here is an overview of some common fabrics used for embroidery:
Cotton is lightweight, breathable, and soft on both sides. It has medium nap that gives it greater lusters compared to other fabrics such as polyester or wool. Cotton produces grains when pressed with an iron which may affect stitching patterns on certain designs but is overall great for intricate details as well as bold outlines.
![How to Use Different Sewing Machine Stitches [Guide]](https://www.contrado.co.uk/blog/wp-content/uploads/2018/01/banner.jpg)
Polyester blend has a smooth surface with no nap that makes it ideal for delicate details or printed designs where precision is essential. It also has some or minimal shrinkage which makes it great for experimental stitches techniques while ensuring they won’t end up distorted in size after washes.
Wool has an intense fuzzy texture that acts like Velcro when grabbed by an embroidery needle’s eye which requires slower stitching speed and caution to avoid stretching or compressing fabric fibers too much. This can be beneficial when covering large patches of area because tension issues don’t occur as quickly as in polyester blend materials; this ensures each stitch looks good for longer amounts of time. Furthermore wool provides tremendous body and drape making it perfect garment material for elegant looks without compromising design quality from repeated usage over time — perfect if you’d like your pieces to last forever!
Conclusion
The number of different types of stitches available on embroidery machines can be overwhelming. However, by understanding the basics of each type and considering what project and fabric you are working with, you can narrow down the choices and create truly unique projects.
Once you have selected the right stitch for your project, be sure to adjust the speed, tension and threading to ensure optimal performance. With practice, you will soon be able to easily recognize which stitch is best suited for a particular job.
Just remember that practice makes perfect, so don’t hesitate to try out new stitches and techniques as your skill level grows.
See Also-
- Best Embroidery Machine For Custom Designs 2023
- Best Computerized Embroidery Machine 2023
- Best Embroidery Machine For Beginners 2023
- Best Embroidery Machine For Large Designs 2023
- Best Embroidery Machine For Small Business 2023