
Have you been struggling to get your embroidery machine running smoothly? You’re not alone!
In this article, we’ll go over the most common issues with embroidery machines and provide helpful tips on how to troubleshoot and fix them. Read on as we’ll equip you with everything you need to know!
This guide will provide you with information about common issues that you may encounter when using an embroidery machine, as well as step-by-step instructions for troubleshooting each issue. Whether your embroidery machine is brand new or has been used for years and still needs some occasional maintenance, this guide will be an invaluable resource for keeping your machine running smoothly.

In this document, we’ll cover the following topics:
- Introduction
- Safety Guidelines
III. Troubleshooting Common Issues
- Maintenance Tips
- Conclusion
Each topic will provide useful information to help you diagnose and fix any problems that may arise while working with your embroidery machine, as well as how to keep it running properly. Additionally, we’ll discuss safety guidelines to ensure you are working safely while using the embroidery machine. Let’s get started!
Importance of troubleshooting common embroidery machine issues
Taking the time to troubleshoot any issues that arise with your embroidery machine is important for protecting the longevity of your investment. With proper equipment maintenance and some timely diagnostics, you can often identify the source of problems quickly. This will save you the inconvenience and cost of having to send your machine in for repair later on.
When diagnosing an issue with your embroidery machine, it’s important to first make sure all connections are firmly attached and that you have verified that the power switch is turned on correctly. Then, work through each step systematically to ensure you are looking at all potential problem areas. You might want to check for obstructions in thread guides or thread tensions, examine fabric tension and alignment, look for broken parts or frayed threads inside the frame work, etc.
After following a few basic steps, it’s possible that you have identified what is causing your issue so you can make any necessary adjustments or take more time-consuming measures if necessary – like replacing worn out parts or checking electrical wiring as a last resort if other avenues have been exhausted.
Benefits of being able to troubleshoot your own machine
Being able to troubleshoot and resolve common issues with your embroidery machine is an invaluable skill for any embroidery enthusiast. By learning how to identify and solve these problems, you can save yourself time and money on unnecessary service calls. Additionally, as an expert in your machine’s care, you’ll have a more enjoyable experience every time you use it.
Learning how to troubleshoot allows you to understand the mechanics of your machine inside and out while also giving you a better feel for the type of fabric or thread combination that will work best when creating unique projects. After all, it is important to know what makes your machine tick before running into costly or complicated problems down the road.

Moreover, troubleshooting allows you to identify patterns in thread tension or breakage that could be helpful in streamlining production processes over long periods of time with multiple work orders.
Common issues with embroidery machines
It is inevitable that you will encounter some sort of issue with your embroidery machine. Identifying what is wrong and how to fix it can often save you time, money and frustration. Below are some of the most common issues experienced with embroidery machines:
1.Poor tension – Poor tension can be caused by insufficient thread spool size, incorrect fabric choice or incorrect thread type. Tension adjustment should be done prior to each project as a preventative measure to ensure your embroidery turns out clean and crisp.
2.Thread breakage – Thread breakage is often caused by a worn hook or hook-eyelet assembly, an incorrectly wound bobbin or too much lint in the bobbin case. Cleaning your machine regularly will help minimize dust and lint accumulation which can cause poor stitching quality and frequent thread breakage.
3.Misaligned stitches – Misaligned stitches can be caused by unbalanced tensions between the upper and lower threads, improper bobbin tension, inaccurate needle alignment on the frame or incorrect hoop placement while attaching your fabric to the frame.
4.Frayed edges – Frayed edges occur when there is uneven stitch length or loose loops on one side of the finished product, usually caused by excessive upper tension or damaged needles that are not correctly installed in the machine’s needle bar. To reduce these issues pay special attention when threading and checking that all parts are firmly in place before beginning a project.
Thread issues
Embroidery is an intricate craft and it can be easy for machine operators to encounter issues with their machines. Thread tension, design problems and improper hooping of the fabric can all lead to frustration and inaccurate stitching. In order to ensure flawless work, we will discuss some common troubles that you may experience with your embroidery machine and how to address them.
- Thread Issues
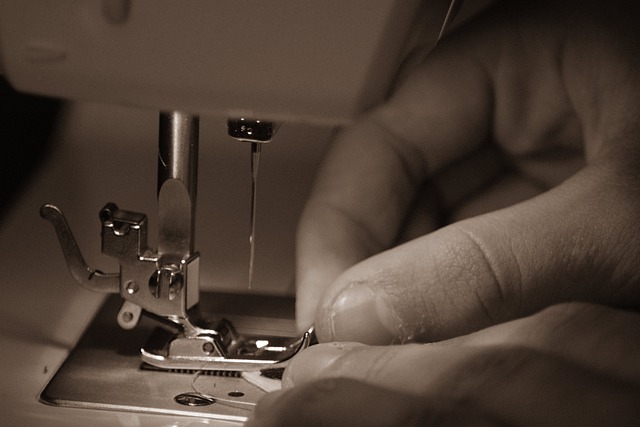
Thread can easily become caught in the thread guides, leading to inconsistent tension or broken threads. To correct this issue, the thread should be adjusted regularly for optimal performance — including cutting off excess spool ends and properly looping the upper thread so it rides a low-tension path around the machine’s components. If you are experiencing repeated thread breakage, it could be due to weak or damaged thread spools, which would require replacement with new spools of better quality embroidery thread. Additionally, do not forget to inspect your needles regularly and switch them out when necessary!
Tension issues
Tension is one of the key components that affect the quality of embroidery stitches. It can help achieve better stitch definition, improve consistency in stitch density and increase durability. The tension on your machine should be adjusted for each thread type, fabric type and project you tackle.
When it comes to troubleshooting issues with tension, reviews and adjustments should begin with the upper thread. The upper thread wraps around a small metal spring in the form of a “U” – check this spring to make sure it is not too tight or too loose, as the thread should move freely without tangling or slipping through. You may also need to adjust the tension knob or magnetic-type tension control device on your machine.
If tension issues persist after trying these steps, you may need to adjust the bobbin case or bobbin thread tension so that it matches the spool or cone tensions you have set above. To check this, simply tap your finger on top of a quilted hoop filled with batting and look closely at how high (or low) formed stitches are laying in relation to each other – this will help indicate whether your tensions have been set properly. If stitches appear too high from their quilted surface, turn your bobbin clockwise slightly until they lower; if they sink too low into ventilated fabric layers, turn it counterclockwise until raised higher again.
III. Troubleshooting the machine
When your machine is causing issues, it is important to identify the root cause before attempting to fix it yourself. In this section, we will provide some tips to help you diagnose what might be wrong with your machine.
Checking Electrical Connections: Before attempting any mechanical repairs, it is important to ensure that the power supply and all electrical connections are in order. Have a qualified electrician inspect the power source and wiring to make sure that power is getting through properly, especially if you are troubleshooting any unstitching problems or spotting on the fabric.
Testing for Needle Damage: If your embroidery project produces fine spots or holes on the cloth surface, this typically indicates needle damage from use and wear of materials over time. Have a technician check for any burrs or nicks on the needle shaft that can produce these fine thread fractures in the cloth during stitching.
Analyzing Thread Fraying: When assessing irregularities in stitches per inch (SPI) or tension problems, first inspect all threads for fraying or breakage due to excessive force during embroidery operations. Check for worn out bobbins/tension devices as well as broken needles which can cause thread fraying and improper stitch placement during embroidery operations. Make sure there is enough thread on the spool before beginning an operation so as not to limit throat space resulting in poor stitch quality during long-running projects.
Checking Embroidery Machine Parts: Similarly if existing parts need replacement due mechanical failure from prolonged usage then have a professional examine them before replacing them yourself. The quality of parts undergoes rigorous testing standards so only invest in genuine OEM replacement parts for best quality as cost efficient repair solution for machines with minimal downtime incurred due failures from unfit parts resulting from third party aftermarket products not intended predominantly dedicated towards repairing embroidery machines alone which are often unreliable even of low cost!
Understanding the cause of the issue
Identifying the cause of problems with an embroidery machine is the first step in finding a solution. Depending on the issue, it could be any number of things. For example, tension problems can be caused by a mis-threaded bobbin, a fault in the threading path, incorrect needle size or incorrect thread tension settings. If your design stitches out poorly on fabrics that are particularly dense or thick, it is likely due to insufficient upper thread tensions. If you can identify which area of your machine is causing the problem then you can begin troubleshooting it accordingly. Common issues that arise include:
- Understanding the cause of the issue
- Selecting an appropriate needle and thread type
- Testing the tension settings
- Cleaning or replacing worn parts
- Making sure you are using proper techniques
Cleaning the machine
Cleaning your embroidery machine is important to ensure it is working at peak performance. Keeping your machine clean not only improves the quality of your embroidery, it also reduces maintenance costs by reducing the need for repairs and prolongs the life of your machine.

To start cleaning, remove any fabric or thread from the machine. Then, take a damp cloth and wipe away any dust or dirt from the surface of your machine, including around and behind the bobbin case. To properly clean the inside of your embroidery machine, you will need to purchase a good cleaner that is specifically designed for this task. Use a cloth or brush to apply cleaner to all areas inside and outside of your machine, including around gears and spindles. If you have an iron frame on your embroidery hoop you may use an old toothbrush or other small brush to get into tight corners and crevices. Make sure that no lint has collected in any part of the hoop as well. When cleaning is complete, reset any dials or settings that may have been adjusted during cleaning.
By keeping your Embroidery machine clean you will help ensure optimum performance for many years to come!
Advanced troubleshooting techniques
When attempting to find a solution to more complicated embroidery machine problems, it is important to have an in-depth understanding of how the machine works. Advanced troubleshooting techniques will involve deeper investigations into the root cause.
To begin advanced troubleshooting of your embroidery machine, start by assessing the issue: what is causing the unwanted results? Is it an issue with tension settings or thread quality? Once you have identified the problem, it’s time to move on to more detailed methods. If possible, consult a manual or online resource associated with your specific machine, as this may offer additional tips for diagnosis and repair.
Always double-check all tension settings prior to probing any further, as loose stitching or structural instability can be caused by loose knots in threads if tension settings are not adjusted properly. You should also check for signs of thread wear or damage, as this can lead to skipped stitches and broken threading sections. Finding the source of these potentially costly errors requires careful measurement and inspection. Lastly, an advanced troubleshooter may opt for a complete disassembly of the machine in order to uncover any unseen problems that may be causing issues with operation.
Although it may seem daunting for those without an engineering background, dedicated embroidery enthusiasts can learn techniques such as measuring tolerances and making small repairs on their own machines which will save both money and time in getting back up and running quickly. Meanwhile routine maintenance is key; regular cleaning and oiling of all components will go a long way toward preventing costly damage down the road!
Changing the needle
The needle is arguably one of the most important components of your embroidery machine and at some point, you will need to replace it. Replacing your needle regularly is an important part of fabric preparation for embroidery, as well as ensuring the longevity and accuracy of your machine’s operation. That said, remembering to change your needle from time to time can be easy to forget in the excitement of a new project. To change the needle in your machine:
- Turn off your embroidery machine and disconnect it from power before any maintenance or repairs.
- Use the included screwdriver to loosen and remove the old needle from its mount on your embroidery machine by rotating it counterclockwise until it comes off completely.
- Using a lint-free cloth made specifically for cleaning electronics, remove any lint or debris that have collected around the needle mount area so that the new needle can fit securely in place without obstruction when inserted later on.
- Insert new replacement needle into its mount firmly while rotating it clockwise until it locks into place with a slight click when secured properly after adjustment with a small Phillips screwdriver when necessary; be sure to double-check that you’re using an appropriate size and type of replacement needle per instructions found in your machines manual or which came with its accessories purchase kit – beware there are needle types designed specifically for industrial grade machines which may damage or even ruin yours if used improperly! It’s also important not to over tighten them since this can dull their effectiveness over time through repeated use without proper care equal intervals for replacements each year should suffice avoid regular daily repairwork affecting quality stitched endproducts due diligence pays off!
Replacing the bobbin
Replacing the bobbin in an embroidery machine is a relatively simple process. The first step is to release the embroidery needle. To do this, remove the bobbin casing by pulling it away from the needle, unscrewing it if necessary.
Then, insert a new bobbin into the bobbin case and thread it through the eye of the needle in a counter-clockwise direction. Threading should be done from left to right when looking down at the top of the machine.
After threading, replace the casing and pull on both ends of your thread, holding one above your needle and one below your needle plate for tension adjustment.
Finally, reinsert your needle into its original position and begin stitching again!
Conclusion
To conclude, troubleshooting common issues with an embroidery machine is an achievable task if you understand the process. By following the steps outlined in this guide, you can safely diagnose and repair a wide range of problems with your machine.
Additionally, be sure to take the appropriate precautions when handling tools or removing components — never operate on a heated machine and always wear protective gear when necessary. Taking care of your embroidery machine in this way can extend its life and help ensure optimal performance for years to come.
See Also-
- Best Janome Embroidery Machine 2023
- Best Embroidery Machine For Clothing 2023
- Best Commercial Embroidery Machine 2023
- Best Embroidery Machine For Patches 2023
- Best Affordable Embroidery Machine 2023